I was recently asked if I could animate this summer’s records from the Bloomin’ Algae App, to help show the spatial patterns as well as the impact of a recent media interest in the subject (and a feature on BBC Breakfast!). I’ve looked at doing something similar before, but this time I wanted to create a higher-end output.
Animating with QGIS TimeManager
First up, we can import our time series data (in this case, point data with an associated date field and verification attribute) to QGIS. Then it’s just a case of installing the TimeManger plugin, opening it up and adding our data layer.
You can tweek the output in the settings menu / time display options, then hit the play button to see how it looks. I found my background layers might flash on and off in this preview mode, but it didn’t affect the output once the video was exported.
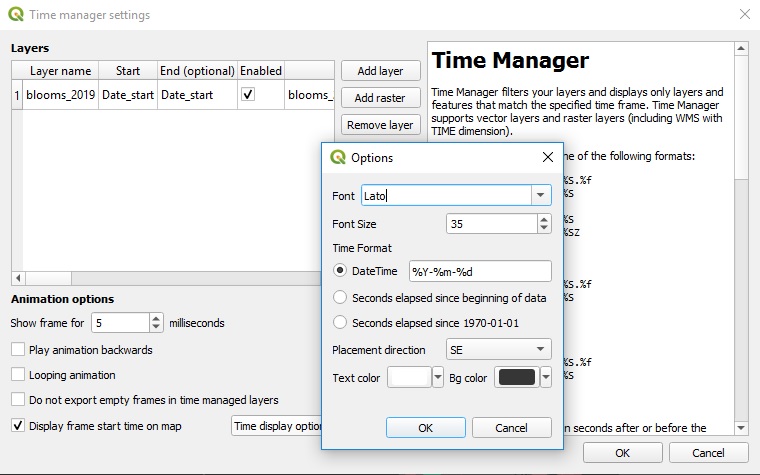
The settings I used in TimeManager (including the time display options)
EPSG 102038 & Graticules
After seeing this great blog post from Alasdair Rae, I thought this ‘World_From_Space’ projection would work nicely for this project. With his suggested addition of graticules, we can add a bit more information to the background map too. Oh, and let’s add some country polygons on there too!
FFmpeg – MP4, Legends & GIF Output
In TimeManager, hit the ‘export video’ button and select ‘frames only’. This will export a series of numbered PNGs, which we can stitch together using FFmpeg – this gives us maximum flexibility for our output. If you’ve not used FFmpeg before, it’s a hugely-flexible command line video converter. From here on in, I’ll presume you’ve added it to your Windows path.
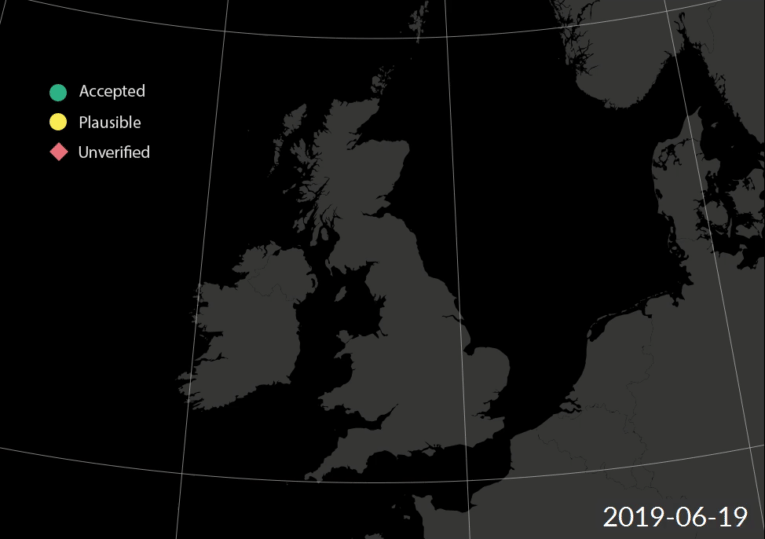
One issue with using TimeManger is you can’t easily add a legend as the output is created from the QGIS Map View. Instead, you can create a legend image (ideally a PNG with a transparent background) then add it to your output with FFmpeg.
MP4 video
Let’s create a basic video output first. The following code is modified from this guide and this Stack Overflow answer. You can read those articles for more info on the options, but this should be roughly what you need to convert output from TimeManager:
$ ffmpeg -r 10 -s 1280x720 -i frame%03d.png -vcodec libx264 -crf 1 -vf "pad=ceil(iw/2)*2:ceil(ih/2)*2" -pix_fmt yuv420p blooms_2019.mp4
Add a legend
Now we’ve created an MP4, we can add out legend by adapting this guide on adding a watermark. There’s not much to this, just the overlay options which decides the legend positioning:
$ ffmpeg -i blooms_2019.mp4 -i legend.png -filter_complex "overlay=50:90" blooms_2019_legend.mp4
Feedback from FFmpeg
Before we continue, I got a response after posting this article from the @FFmpeg Twitter account suggesting the following combined code:
You can make the MP4 and overlay in one command:
ffmpeg -framerate 10 -i %03d.png -i legend.png -filter_complex "[0]pad=ceil(iw/2)*2:ceil(ih/2)*2[bg];[bg][1]overlay=50:90,format=yuv420p" -c:v libx264 -movflags +faststart out.mp4
— FFmpeg (@FFmpeg) September 6, 2019
Create a gif
Excellent. That’s the video output finished, but it would be nice to create an animated gif for ease of display on the web. This is one thing FFmpeg is less good at. Or more accurately, it needs more help than with most other output formats. Essentially, we need to give it some info on the colour palette of our video before it creates the gif, but this can be achieved in one line with a slight adjustment to this GIPHY Engineering guide:
$ ffmpeg -i blooms_2019_legend.mp4 -filter_complex "[0:v] scale=765:-1,split [a][b];[a] palettegen [p];[b][p] paletteuse" blooms_2019_legend.gif
Et voila! Our final output in gif form.